Chair Yoga – A Great Way to Relax Your Neck and Shoulders
Feeling tight or sore in your upper body? How about trying a quick routine of Chair Yoga for your neck and shoulders? It’s an easy way to get a lovely stretch and let go of tension or tightness. Many of us hold a lot of tension in the upper body – especially in the neck and shoulders. When we are under stress or experience anxiety, it’s a natural reaction to bring your shoulders up toward your ears—this is our body’s way of protecting itself.
If we stay in states of stress too long, or find ourselves tensed up out of habit, we can begin to experience chronic tightness, and even pain.
Fortunately, yoga has a remedy for this!
You don’t have to be a power yoga pro to get a wonderful stretch to your neck and shoulders, which will allow you to release the powerful (and large!) muscles and tendons in the neck and shoulders. We can do these stretches seated in a chair and still reap the full benefit.
So whether chair yoga is your main form of exercise, or maybe you’re someone who sits at a desk for long periods of time, I’ve got some quick, simple and every effective stretches you can do that will help you feel lighter, more open, and maybe even refreshed and relaxed! Let’s take a look at these amazing chair yoga stretches for your neck and shoulders.
Seated Cat & Cow Pose
Cat and Cow Poses are ubiquitous in yoga classes of all types – but for good reason. They are a fantastic way to increase flexibility in the neck and spine, and also help you loosen up in the front AND the back of your shoulders. It’s one of the easiest—and best—yoga pose combos you could do, which is why I’d recommend doing these two every day, multiple times a day.
How to do it:
Start by sitting toward the front of a straight-backed chair, so that your feet rest completely on the floor, hip-width apart.
On an inhale, hinge forward from your hips, open your arms wide and rotate your arms so your thumbs point up and back. Widen across your collar bones and look upward, as much as feels comfortable.
On your exhale, lean back a little and round your back, tucking your tailbone under. Bring your arms forward and almost touching but not quite. Rotate your arms so that your thumbs point in and down. Feel the stretch across the back of your shoulders, along your shoulder blades.
Repeat this movement 5-10 times, going slowly to ensure you take relaxed, full, deep breaths.

Chair Cobra Pose
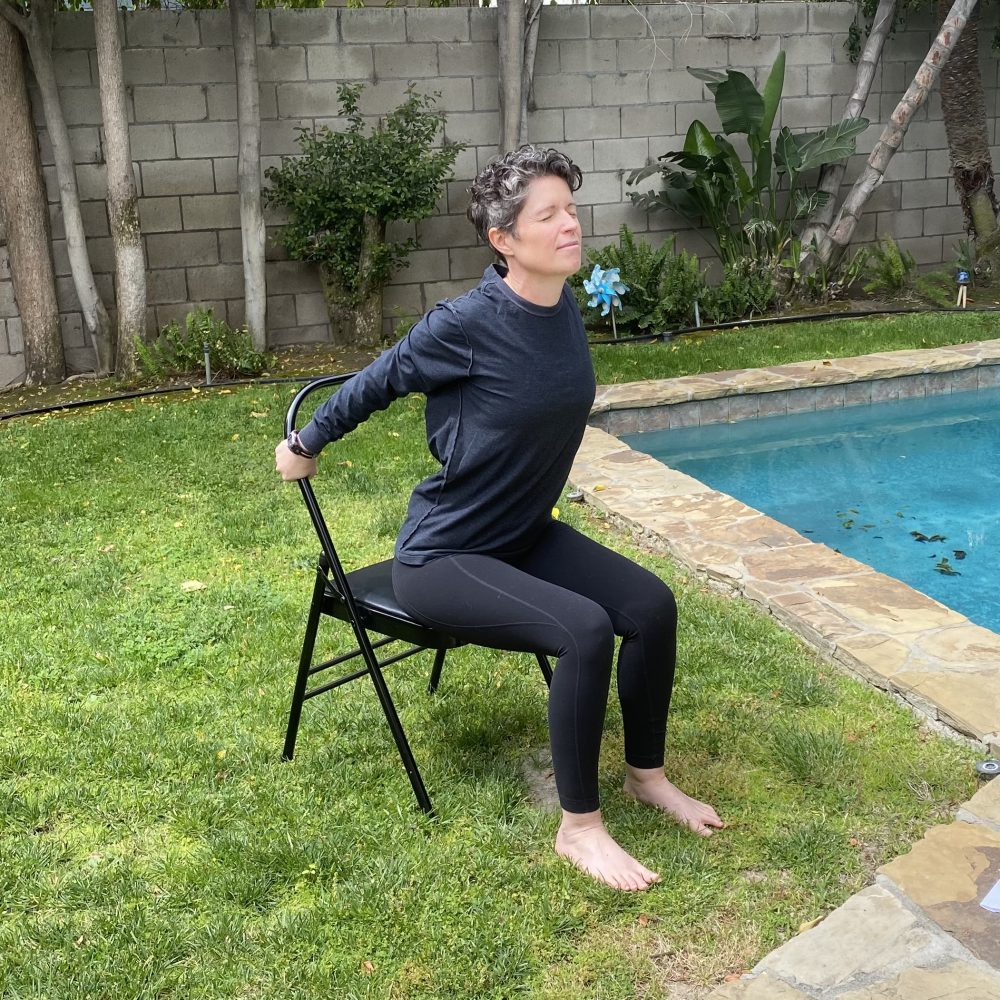
Cobra Pose done in a chair is an effective way to open up along the front of your shoulders and collar bones. If you breathe shallowly due to stress, the muscles along the collar bones and front of your shoulders can get very tight. This can also happen if you’re hunched over in a chair or maybe even a couch. As the shoulders begin to hunch forward, the muscles shorten. So let’s stretch them out with Cobra Pose!
How to do it:
Start by sitting toward the front of a straight-backed chair, so that your feet rest completely on the floor, hip-width apart. Open your arms wide, then start to take them back until you can reach the back of your chair with each hand. Adjust your hands up or down the back of the chair until you find a comfortable spot. Arch your low back slightly, to bring your ribcage forward, and feel the opening across your collar bones and maybe even down the front of your arms. Experiment with squeezing your elbows toward each other. Stay here for 5-10 relaxed breaths, releasing your head back if it feels comfortable to do so.
Seated Arm and Neck Stretch
This stretch is borrowed from Qigong, which is a practice containing many wonderful movements and stretches. (I incorporate many Qigong movements in my Chair Yoga classes!) In Qigong, as is also the case with Yin Yoga, some tension is applied to “lines of tension” in the body, so that when the applied, intentional tension is released, there is a rebound effect and energy can move more freely. In this sequence, tension applied to the arms and neck result in a wonderful rebound effect that will leave you feeling light and refreshed.
How to do it:
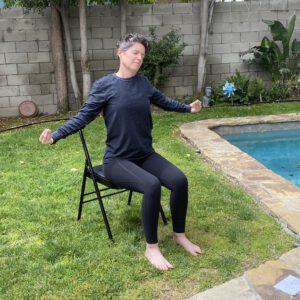
Start by sitting toward the front of a straight-backed chair, so that your feet rest completely on the floor, hip-width apart. Take your arms up overhead and reaching through your pinkie fingers toward the sky. Lengthen through your sidebody.
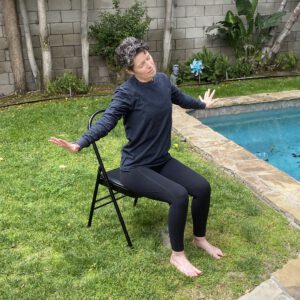
Keep your arms straight, and start to bring them down to shoulder-height or a little lower, keeping your palms up. Bring all your fingers together (making a “chicken beak!”) and then point them toward your body. Keep stretching through your arms, keep pointing your fingers toward you, and drop your right ear toward your right shoulder. Slowly move your head forward and back along/over your right shoulder, relaxing your jaw and enjoying a deep stretch to your neck and arms. Now do the same thing with your head dropped toward your left shoulder. Be sure to breathe deeply and feel free to exhale through your mouth, or even sigh it out. Release that tension!
Release your arms down to your sides and rest for a few breaths. Then take your arms up over head again, lengthen, then point your palms outward and bring your arms out to shoulder-height again, with the palms pressing outward (like you’re trying to push two walls away) and your fingers spread wide. Once again drop right ear toward right shoulder, roll your head slowly as you breathe deeply. Do the same thing on the left side. Release your arms down to your sides. Enjoy life.
Self “Shoulder” Massage
As mentioned earlier, the muscles in the front of the shoulders and along the collar bones can get tight and sore. What better remedy than a short self-massage? This routine relaxes muscles along your sternum, collar bone, and the front of your shoulders.
Being kind to yourself in this way is, in my opinion, one of the sweetest acts of self-care. And it feels GREAT!
How to do it:
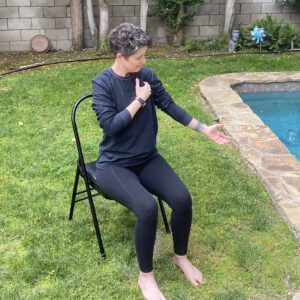
Start by sitting toward the front of a straight-backed chair, so that your feet rest completely on the floor, hip-width apart. With the fingertips of both hands, gently rub small circles up and down the sternum. You can go as high up or down low as you wish, as long as it feels good. Feel the fascia under your hands as you take deep breaths and let this part of your body relax.
Next, use the fingertips of your left hand to rub small circles above and below your right collar bone. Move back and forth along the clavicle, lingering in places that might be extra tender, or in places where this feels extra wonderful. Go along the top out toward your shoulder, then back right underneath the clavicle back toward your sternum. Repeat as many times as you want.
Next, rub out along your clavicle toward your shoulder until you reach your arm, and drop down an inch or two until you feel a softer area that’s just muscle. Press in and rub small circles here, and anywhere in this area that feels good. If it’s tender, keep massaging lightly until you’ve released more tension. You can also massage along the top of your shoulder and even down your arm a bit.
Repeat on the other side.

I hope you enjoy this chair yoga routine for your neck and shoulders, and that these simple techniques give you relief from any tension in that area of your body that you may have. And the best part is they require no fancy props or equipment! If you have a basic chair, you can do this routine anytime. (If you want to know what kind of chair I recommend for Chair Yoga, you can check that out here. Note: this is an affiliate link.)
I’ve also recorded a short YouTube Video for neck and shoulders. You can find it here – and while you’re there, subscribe to my YouTube channel to be notified of new videos that come out.
Do you have any other favorite stretches or remedies to reduce tension in your neck and shoulders? I’d love to hear what your go-to favorites are! Leave a comment below or send me a message.
